Ultimate Cake Heart Cake Tutorial: Create a Vintage Masterpiece
Table of Contents
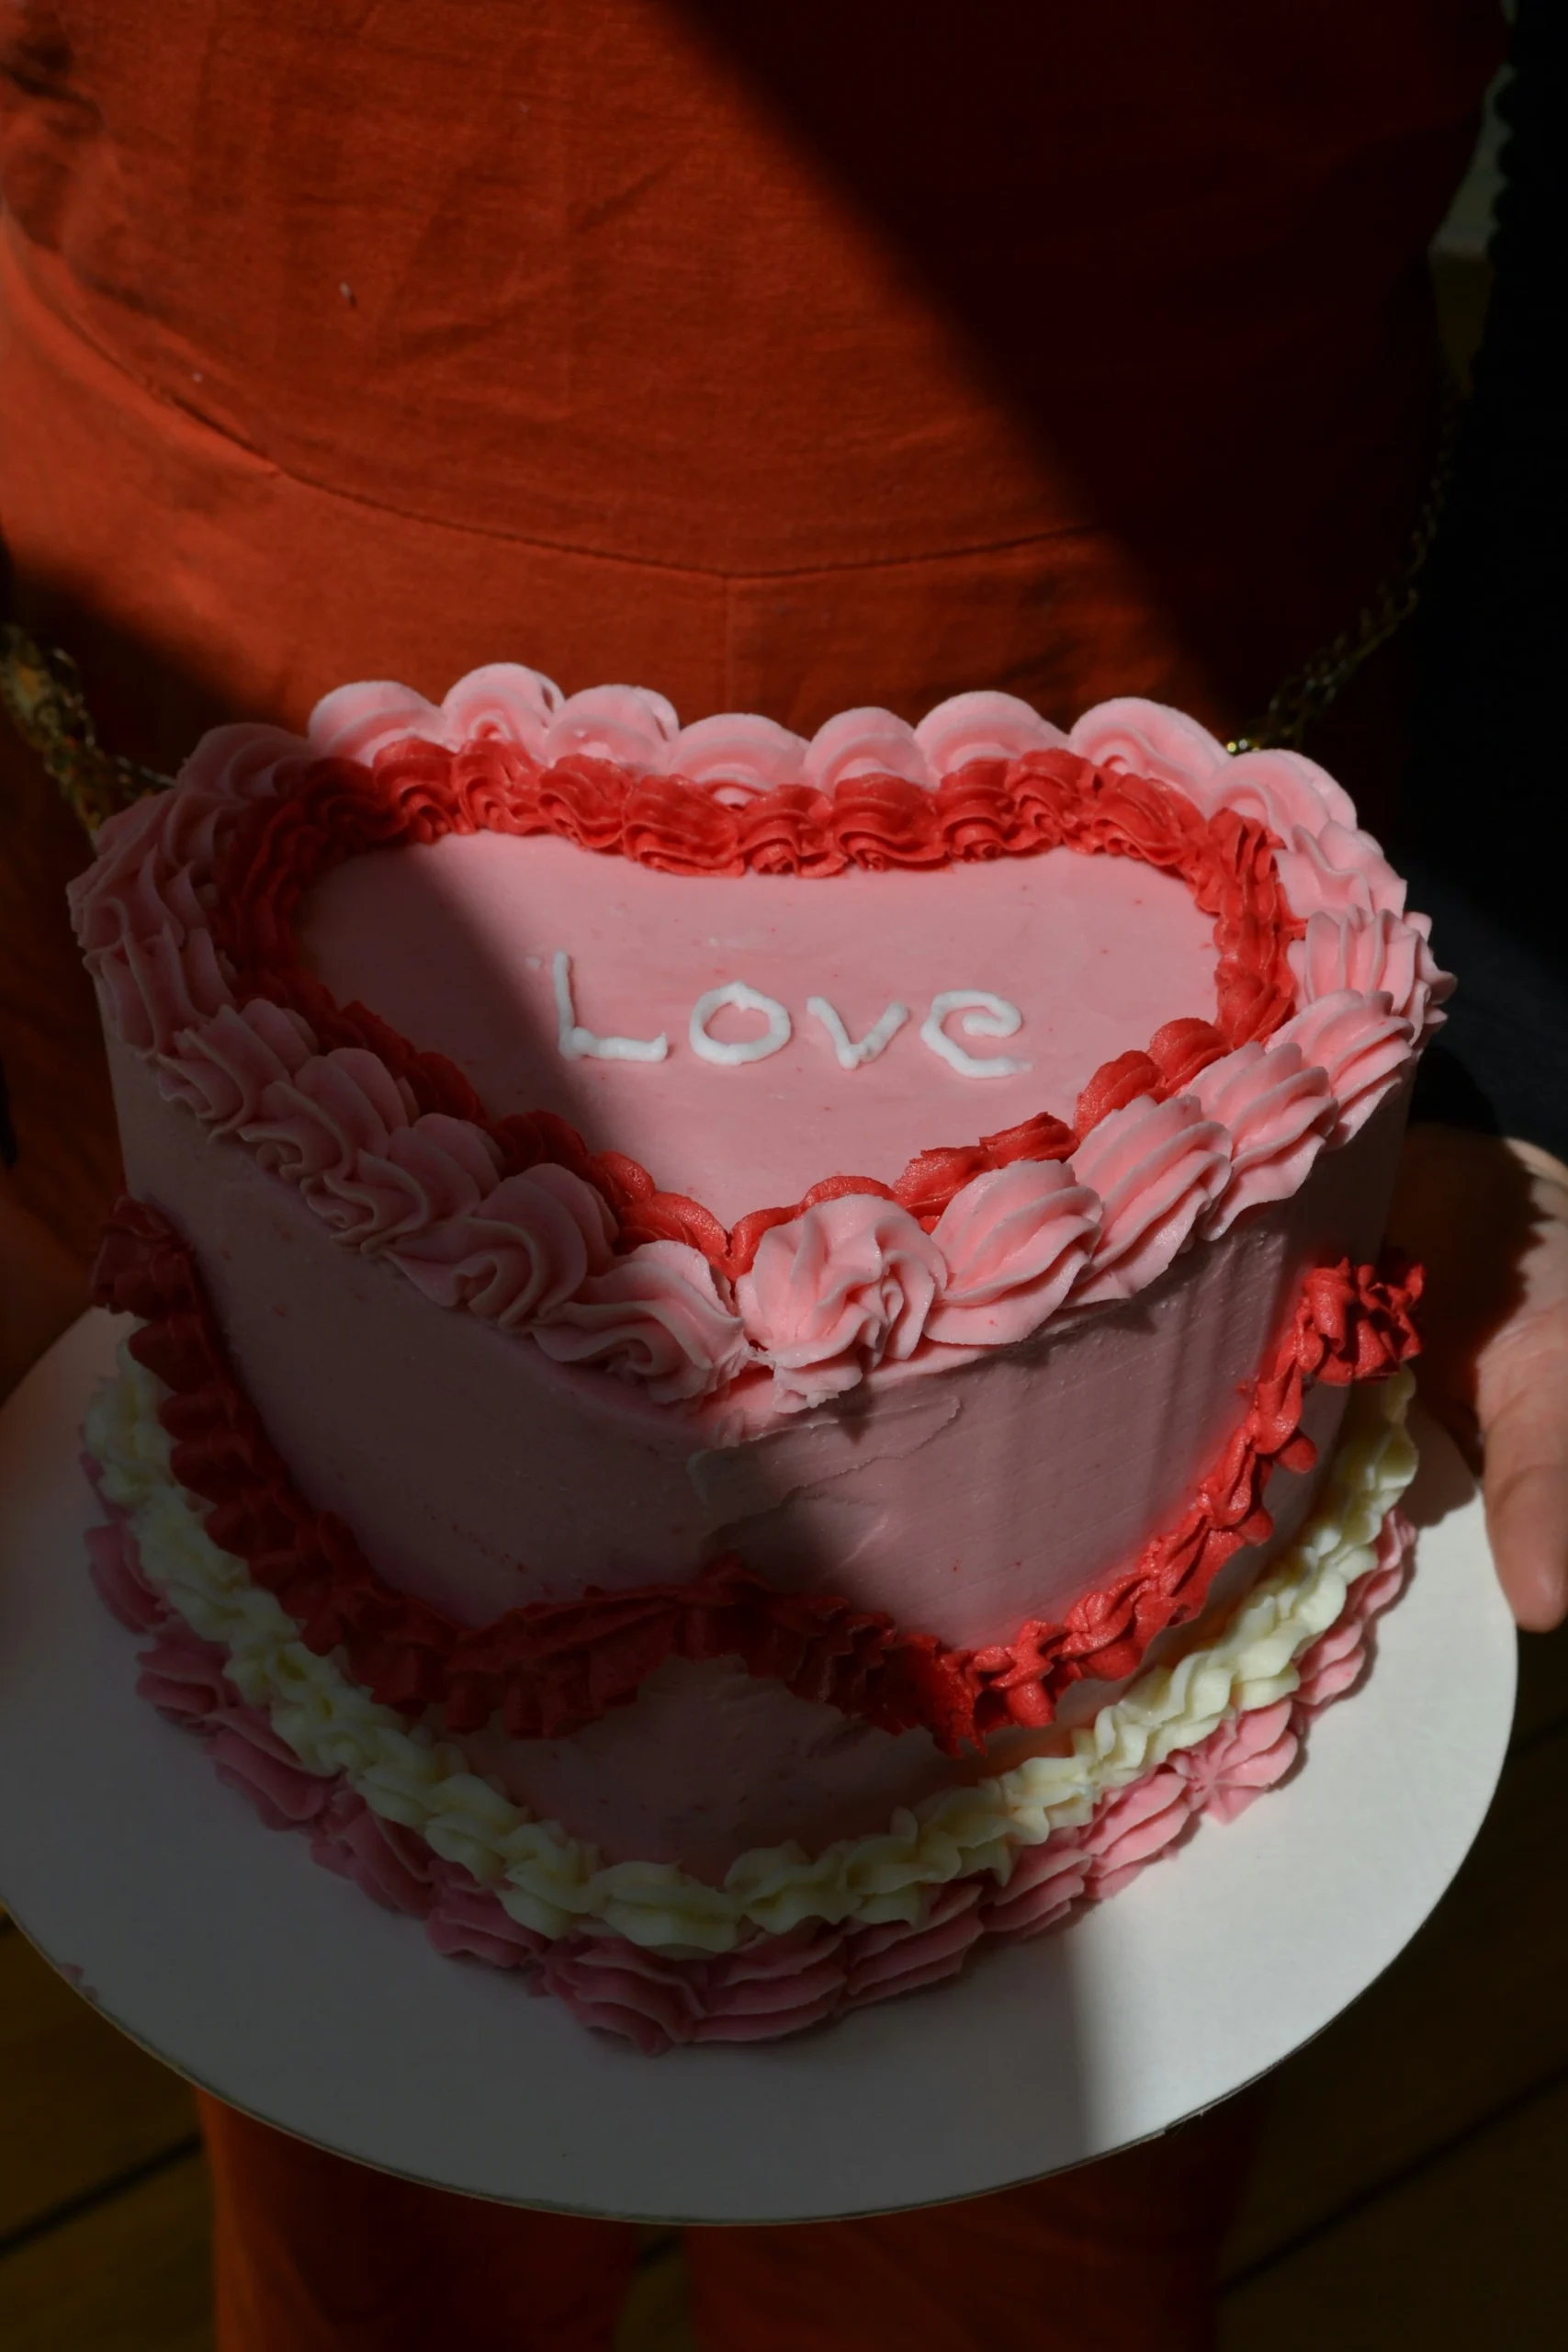
You know that moment when a dessert feels like more than just something sweet—when it looks like a love letter on a cake stand? A vintage cake heart cake does exactly that: it brings together nostalgia, romance, and over-the-top piping in one charming design. When you learn how to decorate this style step by step, you are not just frosting a cake; you are crafting a keepsake that tells someone, “you matter to me,” in buttercream.
Vintage heart cakes have exploded in popularity thanks to video tutorials and social content that showcase frilly piping, heart silhouettes, and romantic messages, inspiring home bakers all over the world to try the style themselves. With a clear plan, the right tools, and a bit of patience, you can confidently create your own vintage heart masterpiece, even if you are still fairly new to cake decorating.
Vintage Cake Heart Cake Style Explained
What “Vintage” Means in Cake Design (H2)
When you hear “vintage cake,” you are usually looking at ornate borders, layered piping, dramatic ruffles, and a slightly old-fashioned color palette. This cake heart cake style is heavily influenced by traditional over-piping techniques, where you build dimension by adding multiple piped layers on top of each other for a sculpted look. The result is a cake that feels luxurious, romantic, and wonderfully extra—perfect for Valentine’s Day, anniversaries, or self-love celebrations.
Why This Look Is So Popular (H2)
On visual platforms, vintage heart cakes stand out because every angle offers texture, depth, and detail that photograph beautifully. Soft pinks, creams, reds, and pastels pair with cherries, pearls, and cursive messages that tap into a dreamy, coquette-inspired aesthetic. For you as a baker or blogger, this means one design can double as a heartfelt gift and highly shareable content for your website or social media.
Tools and Ingredients You Need (H2)
Essential Decorating Tools (H3)
To make your decorating session smooth and enjoyable, gather your tools before you bake. You will typically need:
- Heart-shaped cake pan (6-inch or 8-inch is ideal for a tall, cute cake heart cake)
- Turntable and offset spatula for easier frosting
- Bench scraper or cake smoother for clean sides and edges
- Piping bags (disposable or reusable)
- Couplers if you want to switch tips quickly
- Piping tips such as:
- Open star tips (like 1M or 4B) for borders and rosettes
- Small round tips (like 2, 3, or 5) for lines, dots, beads, and writing
- Petal tips (like 104) for ruffles and frills
- Leaf tips (optional) for tiny leaves around roses
Decorations and Add-Ons (H3)
These finishing touches help push your design from “pretty” to “unforgettable”:
- Maraschino cherries or glazed cherries for a classic retro look
- Sugar pearls, dragees, or nonpareils for added texture
- Edible glitter or luster dust for a subtle shimmer
- Edible hearts, small fondant bows, or sugar roses
- Gel food coloring in pink, red, ivory, and pastel tones
Recipe: Base Cake and Buttercream (H2)
You want a cake that can handle generous piping without collapsing, and a buttercream that holds crisp details but still tastes delicious.
Recommended Cake Base (H3)
A tight-crumb cake like a pound cake or mud cake is ideal because it is sturdy, easy to carve, and less likely to crumble under the weight of heavy piping. Chocolate, vanilla, red velvet, and almond are all excellent choices. Aim for 2–4 layers, depending on your pan size and how tall you want your cake heart cake to appear.
Vanilla Heart Cake Ingredients (H3)
Use this ingredient table as a guide for a 2-layer 8-inch cake that will be trimmed into a heart or baked in a heart pan.
Cake Batter Ingredients (H4)
| Ingredient | Amount |
|---|---|
| All-purpose flour | 2 ½ cups (300 g) |
| Granulated sugar | 1 ¾ cups (350 g) |
| Baking powder | 2 ½ teaspoons |
| Salt | ½ teaspoon |
| Unsalted butter | ¾ cup (170 g), softened |
| Eggs | 3 large |
| Milk or buttermilk | 1 ¼ cups (300 ml) |
| Vanilla extract | 2 teaspoons |
Vanilla Buttercream Ingredients (H4)
| Ingredient | Amount |
|---|---|
| Unsalted butter | 1 ½ cups (340 g), softened |
| Powdered sugar | 5–6 cups (600–720 g), sifted |
| Heavy cream or milk | 3–5 tablespoons |
| Vanilla extract | 2 teaspoons |
| Pinch of salt | To taste |
| Gel food coloring | As needed |
You can adjust the flavors to suit your theme—swap vanilla for almond or add cocoa powder for chocolate—but keep the texture stable and not overly soft to support the piping work.
Step-by-Step: Baking and Building the Heart (H2)
Baking and Preparing the Layers (H3)
- Mix and bake
- Prepare your batter according to your recipe, then divide evenly between two greased and lined heart pans or round pans.
- Bake until the centers spring back lightly and a skewer comes out clean.
- Cool completely
- Let the cakes rest in the pan for a few minutes, then turn them out onto a wire rack to cool fully.
- Never decorate while the cake is warm, or your buttercream will melt and slide off.
Shaping the Heart Without a Heart Pan (H3)
If you do not own a heart pan, you can still create a neat cake heart cake using one square and one round layer. Many tutorials demonstrate this by cutting a round cake in half and placing the halves along two adjacent sides of a square, then trimming to refine the heart curve. Once arranged, you can glue the pieces together with a thin layer of buttercream.
Filling, Stacking, and Crumb-Coating (H3)
- Level the layers
- Use a serrated knife or cake leveler to flatten domed tops so the layers sit evenly.
- Add filling
- Spread a thin layer of buttercream or jam on the bottom layer, staying about 1 cm away from the edge to prevent bulging.
- Crumb coat
- Cover the entire cake in a thin, rough layer of buttercream to seal in crumbs.
- Chill for 20–30 minutes until firm to the touch.
- Final coat
- Apply a thicker, smoother coat of buttercream and use a scraper to refine the heart shape, emphasizing the top “dip” and bottom point.
- Chill again so the surface is firm before you start decorating.
The Art of Vintage Piping (H2)
Choosing Your Color Palette (H3)
A vintage cake heart cake often leans into soft, romantic colors:
- Base color: pale pink, ivory, pastel lavender, or soft mint
- Accent colors: deeper pink, red, burgundy, or white for contrast
- Metallics: optional touches of gold or silver pearls for added glamour
Divide your buttercream into bowls and tint each shade gradually so you do not overshoot the color; remember that colors often deepen slightly as they rest.
Step 1: Shell and Bead Borders (H3)
Start with the most basic yet dramatic details: the outer borders.
- Fit a piping bag with an open star tip and fill it with your main accent color.
- Hold the bag at a 45-degree angle to the cake edge.
- Squeeze gently, let the buttercream puff out, then release pressure as you pull back to create a small tail—this forms a shell.
- Pipe the next shell slightly overlapping the tail of the previous one so you get a continuous, scalloped border.
- For a bead border, switch to a small round tip and pipe tiny, even dots all around the base or along the top edge.
Step 2: Swags and Drapes on the Sides (H3)
Side swags are a hallmark of vintage piping and give your cake heart cake that royal, curtain-like appearance.
- Use a small round tip and a contrasting color.
- Lightly mark guide points around the sides of the cake with a toothpick so your swags fall at even intervals.
- Starting at one mark, pipe a gentle curved line down and up to the next mark, like a string of pearls hanging between hooks.
- You can double-layer the swag: pipe a second, thinner line above or below the first to build depth.
To emphasize the heart shape, you can also pipe mini hearts or loops at the bottom center and along the curves.
Step 3: Ruffles and Over-Piping (H3)
This is where your cake really transforms into a vintage centerpiece.
- Attach a petal tip with the narrow side facing outwards.
- Pipe ruffles around the inner top border by moving your hand in small up-and-down motions while maintaining steady pressure.
- For extra drama, add a second ruffle inside the first using a contrasting shade.
- Over-piping means adding smaller details, like tiny shells or lines, directly on top of existing borders to create a layered, sculpted effect.
You can repeat this layering around the top edge and over the swags until the cake looks lush and full without feeling messy.
Step 4: Rosettes, Dots, and Tiny Details (H3)
To break up larger areas and hide any imperfections:
- Pipe mini rosettes using a small star tip—start in the center of where you want the rose, squeeze, rotate slightly, and release.
- Add micro dots or tiny stars between swags and borders to fill gaps.
- Use a leaf tip with a green-tinted buttercream to add a few leaves around roses for a delicate garden feel.
Writing, Garnishing, and Presentation (H2)
Adding the Message (H3)
The central message is often the emotional focal point of a cake heart cake: words like “Love,” “Baby,” names, or short phrases.
- Lightly sketch your word in the center of the cake with a toothpick first.
- Use a small round tip and a smooth, slightly softer buttercream so the lines flow cleanly.
- Pipe slowly, lifting the tip slightly off the surface as you write so the line glides rather than drags.
Finishing Touches and Toppers (H3)
Decorations can be simple or lavish:
- Cluster cherries or berries at one corner of the heart or symmetrically along the top border.
- Sprinkle a few sugar pearls along the swags for added sparkle.
- If you want height, place a small fondant bow, sugar heart, or custom acrylic topper near the top dip of the heart.
For photos, place your cake heart cake on a simple stand with a neutral background and shoot near a window for soft, natural light that highlights the texture of your piping.
FAQ About Making a Cake Heart Cake (H2)
Can you make a cake heart cake without a heart-shaped pan? (H3)
Yes, you can. Bake one square and one round cake, cut the round cake in half, and place each half along two adjacent sides of the square to form a heart outline. Trim and shape as needed, then crumb-coat and decorate as usual.
What is the best frosting for a vintage cake heart cake? (H3)
For defined piping, use a butter-based frosting like American Buttercream or Swiss Meringue Buttercream. American Buttercream is easier and crusts slightly, which helps details stay sharp, while Swiss Meringue gives you a silky, elegant finish with smooth lines.
Why is my piping sliding down the sides? (H3)
If your icing is sliding, either your cake is too warm or your buttercream is too soft. Chill the cake until it is firm and thicken your buttercream with extra powdered sugar, then test again on a small area before continuing.
How far in advance can you decorate a cake heart cake? (H3)
You can bake the layers 1–2 days ahead, wrap them well, and store them chilled. Decorate the day before serving and keep the finished cake in the fridge in a cake box; bring it to room temperature for 30–60 minutes before slicing so the texture and flavor shine.
Conclusion and Call to Action (H2)
When you break the process down into simple stages—baking, shaping, crumb-coating, piping, then finishing—you discover that a vintage cake heart cake is far less intimidating than it looks. With a sturdy base, well-tinted buttercream, and layered borders, you can turn a plain heart into a romantic centerpiece that feels tailor-made for the person you are celebrating.
Now it is your turn: choose your color palette, preheat your oven, and set aside an afternoon just for you and your piping bags. As you practice these techniques, your confidence will grow with every swirl and swag. If you share your finished cake online, invite your readers or followers to try the tutorial too—link back to your step-by-step instructions, ask them to tag you in their photos, and build a community of bakers who are all creating their own unique cake heart cake stories.
did you try this recipe ?
There are no reviews yet. Be the first one to write one.